With your base course installed, backfilled and compacted, you're ready to install Mosaic panels.
Each panel is 10 inches tall and comprises two courses of two units each: one VERSA-LOK Standard unit and one Cobble unit in one course, and two Accent units in the second course.
You can achieve a random pattern by rotating four different
configurations of the four-unit panel throughout the wall. For example,
alternate the position of the two Accent units with the Standard and
Cobble units in each panel, and randomly mix the order of the Cobble and
Standard units within the panel.
Remember: Be sure to keep all vertical face joints tight when sliding units into place!
VERSA-LOK's unique hole-to-slot pinning system allows Mosaic panels to be installed on a variable bond; panels do not need to be placed exactly halfway over the lower-course panels, or half-bond. The bond between panels can vary in relation to other joints in the wall to enhance the random-pattern appearance, but panels should generally overlap by at least 4 inches to aid structural stability.
Setting the Pins
Two VERSA-TUFF Snap-Off pins normally are used for each unit in a Mosaic panel, for a total of eight pins per panel. However, because of the variable bond and offset placement of panels in the Mosaic pattern, sometimes only one pin will fit into a lower unit. When pins drop into the lower course, they should be received in the rear slots of Standard units and front slots of Accent and Cobble units.
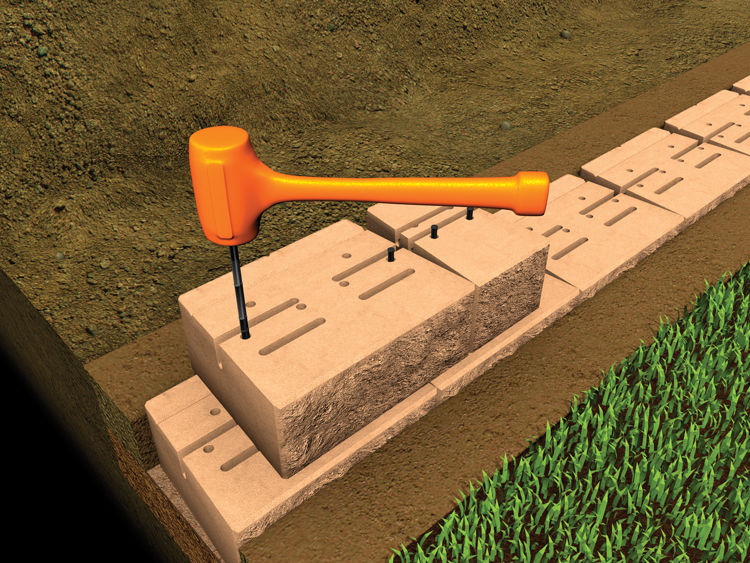
To start the first Mosaic panel, place a Standard unit and Cobble unit on top of the base course. Insert two VERSA-TUFF Snap-Off pins through the front holes in both the Standard and Cobble units so they fall into the slots of the Standard units in the base course below. Use the outside holes (1 and 4) when possible, but if one of those outside holes is not usable, move the pin to an inside (2 or 3) hole. For Standard and Cobble units, pins are fully seated when they are recessed below the top of the units. Use a mallet and an extra pin to seat the installed pins about 1 inch below the top surface of the upper units.
Next, place two Accent units on top of the Standard and Cobble units with a setback of 3/4 inch. Insert two VERSA-TUFF Snap-Off pins through the front holes of each of the Accent units so they fall into the slots of the Standard and Cobble units below. When possible, use the outside holes of the Accent units.
For Accent units, pins will initially stick out of the top of the unit. Snap off the extended portion and then use a mallet and an extra pin to seat the installed pins about 1 inch below the top of the unit. After pinning, pull the units forward to remove any looseness in the pin connections
Begin the adjacent panel with two Accent units on the bottom and a Standard and Cobble unit on top. As you build your wall, randomly mix the order of Cobble and Standard units within the panels to avoid a repetitive pattern.
Continue constructing panels through the length of the wall,
alternating the order of the top and bottom units every other panel.
Always install an entire four-unit Mosaic panel before proceeding to the
next panel on that course. Also, don’t proceed to the next course of
panels until you have completed the entire previous course, including
all pinning. Now is a good time to check the alignment at the back of
the units, and the level of the panel from front to back and side to
side.
Before adding each course, sweep the tops of installed units to
remove any debris. As you position each unit, slide it into place. This
helps remove any imperfections from the surfaces of adjoining units and
ensures a tight fit. Our pinning system provides a ¾-inch setback. After inserting
pins, push/pull the units toward the front of the wall to remove any
looseness in the pin interlocks.
Important: Make sure the pins are fully seated in the lower-unit receiving slots. If necessary, use an extra pin and a mallet like a nail set to fully seat pins. Pins are fully seated when they are recessed approximately 1 inch. When pins are set in the first unit, follow the same pattern down the entire wall. Install no more than two courses of panels (20 inches) before backfilling and compacting behind your wall.
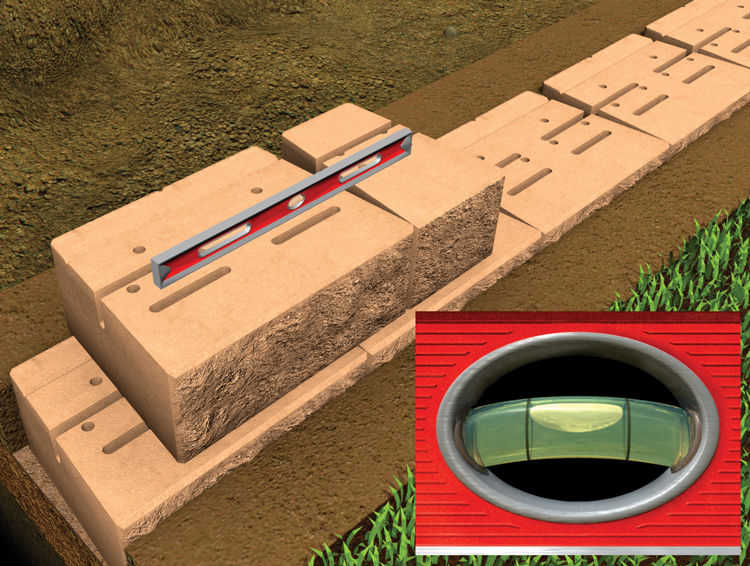
Level Each Course
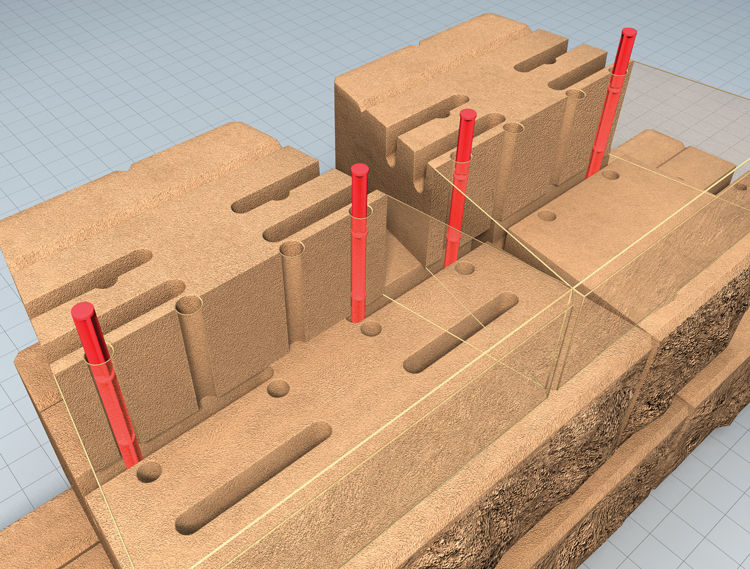
Pinning Detail