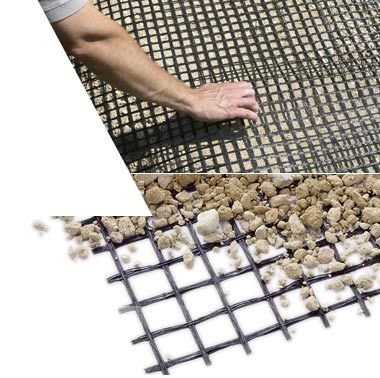
Geogrid is a high-strength polymer product used as soil reinforcement for taller walls.
Geogrid soil reinforcement must be installed behind any walls over 4 feet tall and walls with slopes or loads.
Horizontal layers of geogrid provide tensile strength to hold the reinforced soil together, so that it behaves as one mass. Geogrid also connects the wall units to the reinforced soil.
Geogrid is supplied in rolls and is manufactured to provide long-term durability, soil interaction, connection the wall units, and resistance to installation damage. Geogrid comes in a variety of strengths and usually is stronger in one direction.
Using the correct geogrid type in the proper orientation is important.
The number of geogrid layers needed for a wall, the type and strength of geogrid required, and the length of geogrid needed is dependent on soil conditions, wall height and loads or surcharges above the wall. The required geogrid length, vertical spacing and strength will vary with each project depending on wall height, loading, slopes and soils. A professional civil engineer (P.E.) should prepare the final geogrid-reinforced wall design for each project.
Caution: You are responsible for verifying site conditions, obtaining necessary final designs from a qualified, licensed civil engineer, and complying with all local building codes and engineered plans. If you change an engineer’s plan, YOU are liable.
Geogrid must be installed so that the strongest direction runs perpendicular to the wall face. Improper geogrid installation can result in wall failure. Geogrid generally is strongest in the direction it is rolled.
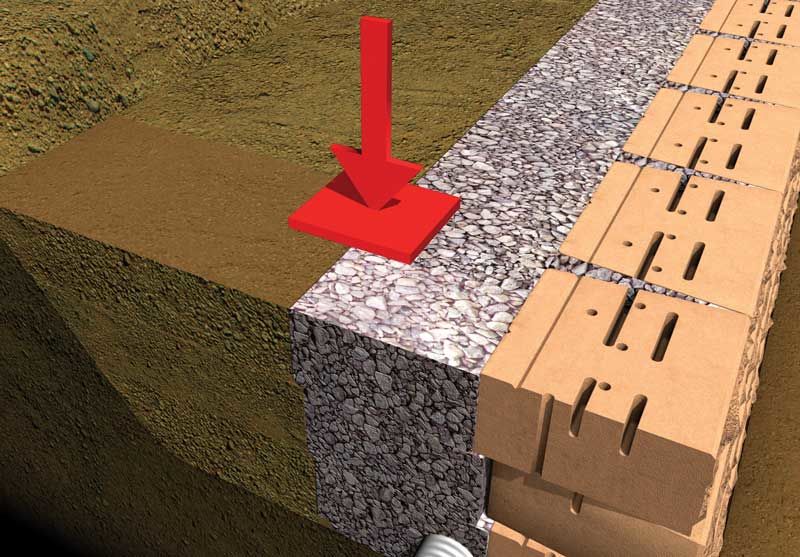
Place the end of the geogrid on top of the course of units about 1 inch from the wall face and roll it away from the wall. You can either precut geogrid to the lengths needed, or simply cut the geogrid at the necessary length when rolling away from the wall.
Place adjacent sections of geogrid directly next to each other. There should be no gaps in the geogrid along the length of the wall. Do not overlap geogrid layers directly on top of one another. Slick surfaces of geogrids will not hold in place properly when directly overlapped. Also, overlapping geogrid in the units will cause the wall to be uneven at that point and may create a noticeable ripple in your wall.
Placing geogrid behind curves and corners requires special layout and overlapping procedures. For more information, see Technical Bulletin No. 3. With
the geogrid rolled out, connect the geogrid to the wall by installing
and pinning the next course of VERSA-LOK Standard units. For
geogrid to be effective, there cannot be any slack in the geogrid.

Roll geogrid away from the wall.
Pull the geogrid taut and anchor the end—typically with stakes or backfill material. The geogrid only needs to be pulled tight enough so there is no slack; don't pull the geogrid so taut that you move your wall.
With
your geogrid pulled taut and secured at the wall face by at least one
pinned course, proceed with placement of drainage aggregate, backfilling
and compaction over the geogrid.
 Note: Place at least 6 inches of backfill before using any tracked equipment on top of geogrid.
 Tip:
If you are installing up to three courses before backfilling, you can
install and pin the geogrid on the specified course and then flip the
grid over the front of the wall. Compact in lifts of 6 inches or less
and when you get to the course with the geogrid, simply flip the geogrid
back over the wall, secure it and compact.
Tip:
If you are installing up to three courses before backfilling, you can
install and pin the geogrid on the specified course and then flip the
grid over the front of the wall. Compact in lifts of 6 inches or less
and when you get to the course with the geogrid, simply flip the geogrid
back over the wall, secure it and compact.

Stake geogrid to hold it in place.
With your geogrid pulled taut and secured at the wall face by at least one pinned course, proceed with placement of drainage aggregate, backfilling and compaction over the geogrid.